Ij.start.canon Setup

Here, we will explain to you the process of setting up a Canon printer from ij.start.canon. Locate the Canon printer model name at the front or top of your Canon Maxify, PIXMA, ImageProGraf, and others. Before attempting the setup process, download & install the Canon printer driver from ij.start.canon on your different device.

  • Home
  • Contact Us


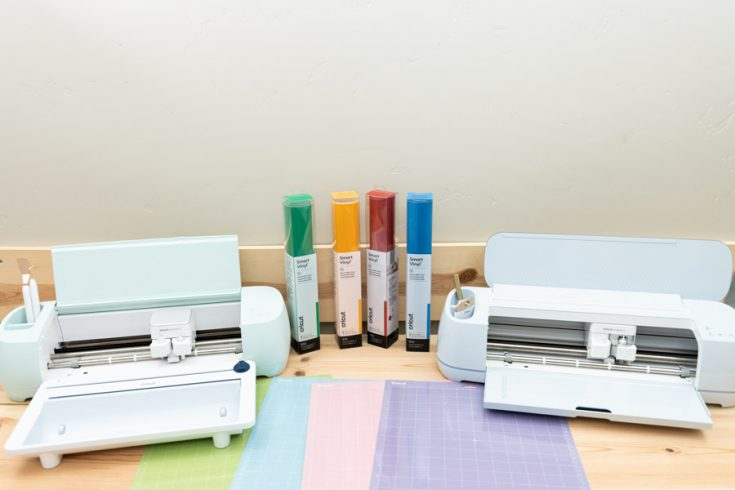
 Do you know how to use Cricut transfer tape for your DIY craft projects? Cricut Transfer Tape isn't really tape. Cricut Transfer tape is a removable adhesive material on one side. This is where transfer tape will come in handy. Because vinyl is so thin, it's difficult to lift without it. It also gets pulled very easily...so picking it up with fingers was a dumb move. visit at-  Cricut.com/setup

We cover the basics of using Cricut transfer tape for your craft projects. Use some tips and tricks below to make your vinyl Cricut craft projects even easier. If you've never used Cricut transfer tape before or think you can get some help fixing it, these tips and tricks are just for you. So, let's get started with it. 

What is Cricut Transfer Tape?  

It is a sticky-backed material that helps you transfer your vinyl design from the backing to your finished project. The transfer tape has rolls or sheets and can be made from paper or plastic film. Some transfer materials have a paper backing, and some don't. Although transfer tapes can vary in size, form, and flexibility, they all perform the same function: they allow you to easily transfer your vinyl design from its paper backing to your final project.

Different Types of Cricut Transfer Tape 

It has both regular and strong grip transfer tape. The regular one is perfect for most projects, but you'll need a firmer grip for glossy vinyl. Additional strength is required to hold the surface. So, if you're having trouble getting the vinyl off the backing sheet, try a stronger grip transfer tape instead.

Why Use Cricut Transfer Tape?

Have you ever had trouble transferring the adhesive vinyl design from the backing paper to the correct orientation on your surface? It is tough if you have more than one piece, and they need to be oriented correctly about each other. That's where transfer tape comes in. It makes orienting everything so much easier. visit at- www.cricut.com/setup

Follow the Steps To Use Cricut Transfer Tape 

Begin by cutting a design out of adhesive vinyl with the Cricut machine. Then, remove all the excess around your design. You'll need to break off the transfer tape when you only have the design you want to transfer. Follow the steps given below to use Cricut transfer tape on your projects: 

1. First, cut a piece of transfer tape slightly larger than your design. You can use the transfer tape many times before discarding it, so you may want to leave it a little bigger for other projects you're working on.

2. Next, peel back the backing paper. Keep in mind that to save it so you can put the transfer tape back on it for later use.

3. After that, apply transfer paper to the design thoroughly. A scraper will work well for this, but you can also use an old gift card.

4. Most people prefer to flip pieces over and remove the backing paper, but you can lift the transfer tape if you want. You want your design to stand neatly on the tape. If it isn't, press down again and proceed with the scraper. Then, try to lift it again.

5. Now that the design is on the tape, you can take it over and put it on your project.


6. Press the vinyl down well, and you'll want it to burnish well once again.

7. Then, peel back your transfer tape. Make sure your vinyl is well glued to the surface of your project. If it's lifting, replace the tape and burnish some more before lifting it a second time. And that's it. 

Some Tips and Tricks To Use Cricut Transfer Tape On Your Craft Projects

Are you struggling with using Cricut transfer tape on vinyl? We have ten tips and tricks to help you achieve a successful relocation.

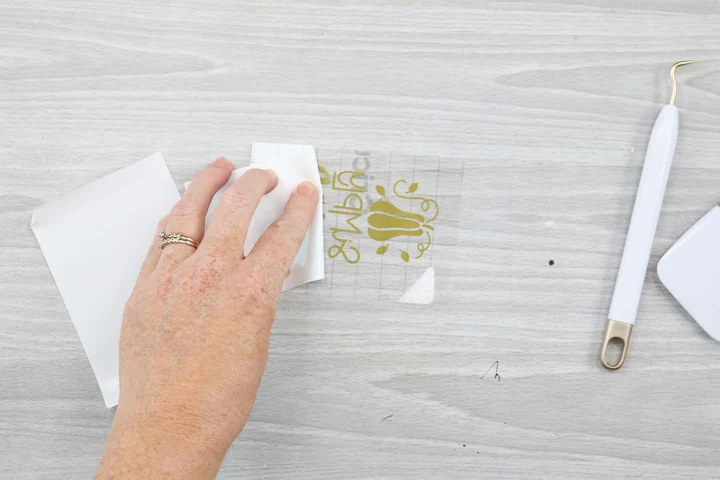
1. Applying transfer tape starts at one end and slowly works it down.


It can be so tempting to throw away the transfer tape - done casually! When applying it, start with one end, push down a little and then slowly apply the rest as you work your way up. The key here is slow! With this method, you'll get everything evenly applied. If you don't apply it evenly, you risk getting kinks in the tape and vinyl. It may not even apply properly to vinyl, and you could potentially put your project at risk. The goal is to apply your tape evenly to the vinyl so you can successfully transfer it to your blanks.

This tip will work for both when applying tape over vinyl (as seen above) and applying it to your surface.

2. Burnish your tape front and back using a scraper tool.

After applying your tape to your design, ensure you're burnishing (rubbing) the front and back of the vinyl/transfer tape combination. This helps the vinyl stick to the tape.

3. Pull down at a 45-degree angle as you remove the tape.


This method has helped a lot! First, pick a corner and extrude at a 45-degree angle. You will start this way because you start with a corner but continue to use this angle as we remove it.


 If you are installing your printer for the first time and want to put paper in Brother printer,
then you will get familiar with its steps here. Through this article, you will know how to
put paper in Brother printer paper tray1 and the paper tray2.

Visit more details- Setup.brother.com

How to Put Paper in Brother Printer Paper Tray 

1. Firstly, take out the paper tray from the Brother printer to put paper in Brother
printer.
2. Close the first paper support flag if open, and then close the second one.
3. Adjust the length of the paper tray if required according to the type of paper.
4. Press the paper guide and slide it to fit the paper size, ensuring that the triangular
mark on the paper guide lines up with the paper.
5. After that, open the output cover of the paper tray1.
6. Press the paper length guide and slide it to fit the size of the paper.
7. Ensure that the paper is appropriately stacked to avoid paper misfeeds and jams.
8. Now, put paper in Brother printer using the below steps:
a. If you are using a letter, A4, or executive size paper, close the output cover
of the paper tray and put paper in Brother printer paper tray. Ensure that
you keep the print side down and flat in the tray in landscape position.
b. If you use the ledger, A3, or the legal size paper, put paper in Brother
printer paper tray. Ensure that you keep the print side down and the top
edge first. Also, ensure that the pages are flat in the tray and are in a
portrait position. Now, close the output cover of the paper tray.

9. Once you put paper in Brother printer, adjust the paper guide to fit the paper size
with the help of both hands. You must ensure that the sides of the paper touch
the paper guide.
10. You must also ensure that the paper is flat in the tray and does not exceed the
maximum paper mark. You must not overfill the Brother printer paper tray.
11. Keep the paper tray back in the printer once you put paper in Brother printer.
12. While holding the printer paper tray in its position, pull out the first paper support
flag until it gets locked into its place, unfolding the second paper support.
Read More- support.brother.com

How to Put Paper in Brother Printer Paper Tray

1. Firstly, take the paper tray from your Brother printer out to put paper in Brother
printer.
2. Now, adjust the paper tray length according to the paper size if required.
3. Open the printer paper tray cover, press the paper guide and slide it to fit the
paper size.
4. When you load A4 or the letter-size paper, keep it landscape orientation and raise
the A4/LTR stopper. Ensure that the mark of the paper guide lines up with the
paper mark.
5. Now, put paper in Brother printer paper tray with the print side down and in a
position according to the paper size.
6. Adjust the paper guide to touch the side of the paper stack. Ensure all the papers
are flat in the tray and not above the maximum paper mark.
7. Once you put paper in Brother printer, close the tray cover and insert it back into
your Brother printer.
8. When you use a legal or the A3 size paper, you must extend the paper tray1 over
tray2. You have to pull out the paper tray1 from the printer. After that, as you take
out the front part of the paper tray, press the release button.
9. When you use an A4 or letter size paper, take out the first paper support flag and
open the second paper support. If the letter-size paper is in paper tray1, open the
output tray cover and raise the A4/LTR stopper to keep the pages in landscape
position. Close the printer output tray cover and insert it back into your Brother
printer. Lastly, take out both the paper support flag of the printer.

Visit at- Setup.brother.com

Final Words

Before you start printing, you have to load paper on the printer. Whenever you get stuck,
you can take the help of the above steps to put paper in Brother printer using the above
actions easily. Here, you have the step-by-step guide that helps you correctly put paper
in Brother printer.

FAQs

Q1- Can I load a ledger-size paper in a Brother printer?
Ans- You can put the ledger-size paper in the Brother printer. You have to ensure that it
is of size 11 x 17 inches (279.4 x 431.8 mm). You can easily print, copy and fax the
ledger-sized paper via your Brother printer.
Q2- How can I adjust the paper size of the Brother printer?
Ans- First, press the Tray Setting button and the paper size you have in Tray1 and Tray2.
For Tray1, press the right or the left arrow and scroll down to the paper size option.
Now, select the paper size. For Tray2, you can directly choose the paper size. Finally,
press the Exit or the Stop button.
Q3- What if I do not load the paper properly?
Ans- If you do not load the paper correctly in the tray, you might face paper jam. Once
you encounter the paper jam, you must remove all the jammed paper from your Brother
printer.

Visit more- print photos on Brother printer 

 With the new launch of Cricut machines, we thought it would be the right time to understand the main differences: Cricut Explore 3 vs. Cricut Maker 3. Are you wondering which machine is better for you? We look forward to helping you with that decision-making process. 


We will keep it simple for you: The major difference between the Cricut Explore 3 and Cricut Maker 3 is the cutting technology. The Cricut Maker machines line is what's called an adaptive tool system. This system lets the Cricut Maker work with 13 tools, while the Cricut Explore machine line can operate with 6 tools. The Cricut Maker Tools cut, write, score, foil, debounce, engrave, etc. The Cricut Explore 3 cut, write, score and file. Let's take a closer look at each blade and tool for each Cricut machine. Today, we will discuss the comparison of Cricut Explore 3 vs. Cricut Maker 3 below. 

Visit For More Details- Cricut.com/setup

Major Differences: Cricut Explore 3 vs. Cricut Maker 3

The Cricut Maker 3 is in the top line of the Cricut machine. You can use this machine to create almost any type of project you can dream up. The Cricut Explore 3 does almost as much as Cricut Maker 3 for a little money. So, which machine works best for you?


Let's take a look at what both: Cricut Explore 3 vs. Cricut Maker 3 models have to offer.


Features

Cricut Explore 3

Cricut Maker 3

Material compatibility

100+ Different Materials 

300+ Different Materials 

Insertable tools

5 

13 

Cuts 

Yes

Yes

Writes 

Yes

Yes

Scores 

Yes

Yes

Debosses

No

Yes

Engraves

No

Yes

Commercial-Grade Performance

No

Yes

Print-then-Cut

Yes

Yes

Works with Cricut Design Space app

Yes

Yes

Bluetooth Connectivity 

Yes

Yes

USB Connectivity 

Yes

Yes

Utilizes Smart Materials

Yes

Yes

Maximum Material Width

13 Inches 

13 Inches 

Maximum Material Length

12 Feet 

12 Feet 

Color 

Soft Mint Green 

Soft Pastel Blue 


The Cricut Maker 3 includes two clamps to hold a dozen interchangeable tools inside the machine, so you can cut, write, score, deboss, and engrave more than 300+ different materials, including leather and even craft wood. You can use the same size material in the Cricut Explore 3 as you do in the Cricut Maker 3, up to 13 inches by 12 feet with the Smart Material, or up to 13 by 12 inches on the cutting mat.


But, instead of a dozen tools with Cricut Maker 3, you can only use five in Cricut Explore 3. You can cut, write and score but not emboss or engrave. You can use more than 100+ different materials with the Cricut Explore 3, and you can't use thicker materials like leather and craft wood.

What’s Inside The Box: Cricut Explore 3 vs. Cricut Maker 3 


Cricut Explore 3 

Cricut Maker 3

Cricut Explore 3 Machine 


Cricut Maker 3 Machine

Power Cable 

Power Cable

Fine Point Blade

Fine Point Blade

Free trial subscription to

Cricut Access (for new subscribers)

Free trial subscription to

Cricut Access (for new subscribers)

Materials for practice cuts

Materials for practice cuts

Which One Should You Buy: Cricut Explore 3 vs. Cricut Maker 3

While you can't cut thicker materials with the Cricut Explore 3, you can still do quite a bit. You can use more than 100+ different materials such as paper, cardstock, vinyl, HTV (heat-transfer vinyl, also known as "iron-on"), infusible ink, etc.


You can cut, score and write. You can use the print-then-cut feature, which involves sending a design to a home printer and then inserting it into the Cricut machine to be cut out. It's great for greeting cards and stickers. Also, you can place a pen/marker in the tool clamp and write on creations directly.


Make no mistake; the Cricut Explore 3 is still a heavy crafting machine with plenty of space for beginners. You will still need some dedicated area in your house for your craft projects! You can start a business using your Cricut Explore 3, and you won't be able to cut thick materials like leather and craft wood. Why spend the extra money if you don't see yourself taking advantage of the additions to Cricut Maker 3?

Read more - www.cricut.com/setup

Conclusion: Cricut Explore 3 vs. Cricut Maker 3

For the severe craftspeople who want to work with various tools and materials, it's probably worth investing in a more expensive and comprehensive machine.


Some serious crafters get everything they need from the Cricut Explore 3; it's no slouch. If it does everything you want to make, why spend more money on Cricut Maker?


Newer Posts Home

SUBSCRIBE & FOLLOW

POPULAR POSTS

  • How To Use Cricut Transfer Tape? [A Simple & Complete Guide]

Categories

  • Cricut Transfer Tape Cricut.com/setup www.cricut.com/setup 1
  • put paper in Brother printer 1
  • Setup.brother.com 1
  • support.brother.com 1

Search This Blog

Powered by Blogger
  • July 20223

Report Abuse

About Me

My photo
Canon printer
View my complete profile

Trending Articles

  • How To Use Cricut Transfer Tape? [A Simple & Complete Guide]

Popular Posts

  • How To Use Cricut Transfer Tape? [A Simple & Complete Guide]
  • How to Put Paper in Brother Printer- Load Paper Tray
  • Cricut Explore 3 vs. Cricut Maker 3: Which Machine Is Better?

Labels

  • Cricut Transfer Tape Cricut.com/setup www.cricut.com/setup
  • Setup.brother.com
  • put paper in Brother printer
  • support.brother.com

Distributed By Gooyaabi | Designed by OddThemes